Tag: Azure Virtual Machine with SQL

Azure Virtual Machines: Updates for August 2023

Azure Virtual Machines: Updates for August 2023

Azure VM Updates in August 2023

Azure Virtual Machines (VMs) are undeniably one of the cornerstones of Azure, offering flexible and scalable compute resources for a multitude of workloads. In this blog post, we’ll delve into the latest updates and features for Azure VMs that were unveiled in August 2023.

Azure Advisor’s Availability Zone Recommendation

Azure Advisor now offers an Availability Zone recommendation feature to enhance VM resiliency. This capability assists you in migrating VMs to availability zones within an Azure region, ensuring high availability and fault tolerance for your applications. Azure Advisor takes a deep dive into your VMs, considering performance, cost, and compliance factors. Once the analysis is complete, you can effortlessly implement the recommendation with just a few clicks. Alternatively, Azure Resource Manager templates or PowerShell scripts can automate the process. The good news is that this feature is now generally available.

Cross Subscription Restore for Azure Virtual Machines

Another exciting feature that has become generally available is Cross Subscription Restore for Azure VMs. This capability lets you restore your VMs from a backup to a different subscription within the same Azure Active Directory tenant. It’s an incredibly useful tool, especially in disaster recovery, testing, or migration scenarios. Whether you prefer the Azure portal, Azure CLI, or PowerShell, you have the flexibility to perform cross-subscription restore operations.

Retirement of ND-series and NC-series VMs

In a significant move, Azure will be retiring ND-series and NC-series VMs, powered by NVIDIA Tesla P40 and K80 GPUs, on August 31, 2023. These VMs are making way for newer GPU VMs that offer higher performance and support newer CUDA compute capability levels. If your operations rely on ND-series or NC-series VMs, planning your migration to these newer GPU VMs before the retirement date arrives is essential. To assist you in this transition, you can utilize Azure Migrate or other similar tools to assess your readiness for migration and facilitate the process.

Azure NetApp Files Cloud Backup for Virtual Machines

Introducing Azure NetApp Files Cloud Backup for Virtual Machines is a noteworthy development. This feature empowers you to back up and restore your Azure VMs leveraging Azure NetApp Files as their storage solution. Azure NetApp Files is a fully managed file storage service known for its high performance, scalability, and robust security for file-based workloads. Cloud Backup protects your data from accidental deletion, corruption, or even ransomware attacks. You can configure backup policies, set schedules, and define retention periods per your business needs. Moreover, you can restore your data to any point within the retention period. As of now, this feature is in the public preview stage.

In conclusion, these are just some of the highlights of the Azure VM updates that unfolded in August 2023. For a comprehensive look at these updates and more, please explore the Azure updates page or check out the Azure blog.
Take the Next Step: Embrace the Power of Cloud Services

Ready to take your organization to the next level with cloud services? Our team of experts can help you navigate the cloud landscape and find the solutions that best meet your needs. Contact us today to learn more and schedule a consultation.

Step-by-step Guide: Creating Azure VM with SQL in the Azure Portal

How to Create Azure Virtual Machine with SQL

Creating an Azure Virtual Machine with SQL

Creating an Azure Virtual Machine with SQL is necessary to fully leverage the benefits of both Azure VMs and SQL Server. Azure VMs offer unparalleled flexibility and scalability that can be finely tuned to meet your computing needs. On the other hand, SQL Server delivers an extremely resilient and reliable database management system that empowers you to store, manage, and analyze data effectively.

To create an Azure virtual machine with SQL in the Azure portal

  1. Sign in to the Azure Portal account where VM needs to be created.
    The Azure Portal Home pane appears.
  2. In the Search box, search for SQL virtual machine.
  3. Under SQL virtual machines, in the Image list box, choose the required image for the virtual machine and click Create. The Create virtual machine pane appears.

Create an Azure Virtual Machine with SQL

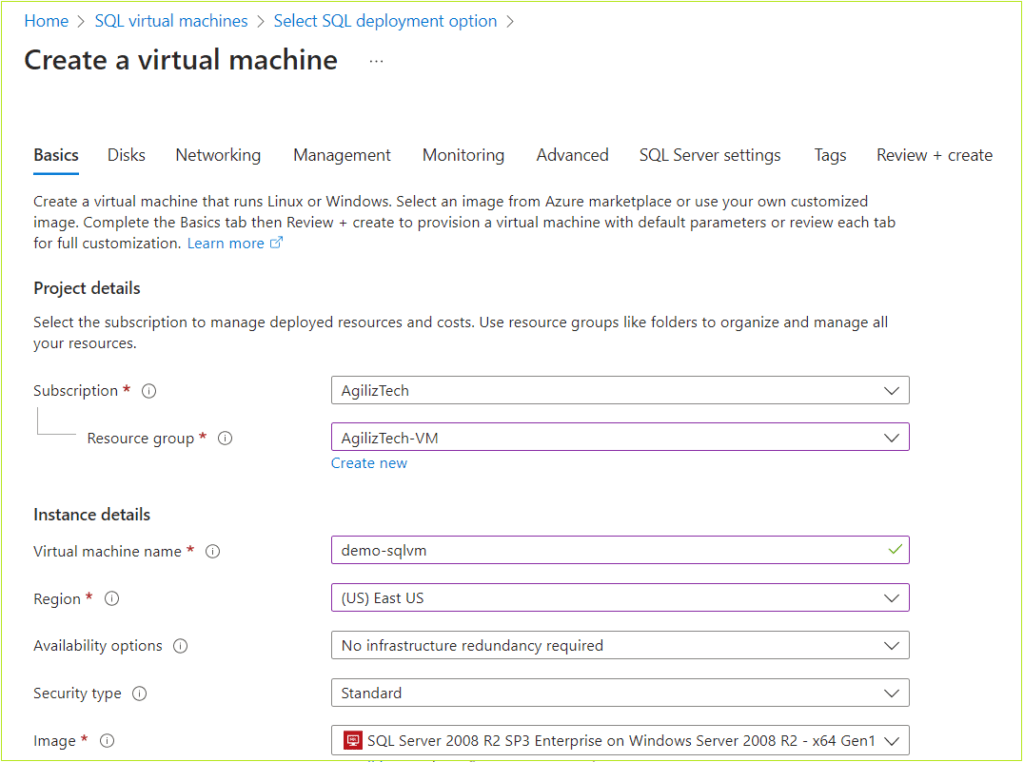
Basics

You can use Basics pane to add project details, instance details, create administrator account, and Inbound port rules.

  1. Under Project details, do the following:
    1. In the Subscription list, choose the required subscription.
    2. In the Resource group list, choose the required resource group.
      If you do not have one, click Create new, enter the name, and click OK.
  2. Under Instance details, do the following:
    1. In the Virtual machine name box, type virtual machine name.
    2. In the Region list, choose the required region.
    3. In the Availability options list, choose the required option.
    4. In the Security type list, choose the required security. The default security type is Standard.
    5. In the Image list, choose the required Windows image.
    6. For the VM architecture, click the required option.
    7. For Run with Azure Spot discount, select the checkbox if you need a spot discount. Click the information icon for more details on the spot discount.
    8. In the Size list, choose the required VM size. If you want to see all sizes, click See all sizes to compare the sizes and prices.
  3. Under the Administrator account, do the following:
    1. In the Username box, type username.
    2. In the Password box, type a strong password.
    3. In the Confirm password box, retype the password to confirm.
  4. Under Inbound port rules, do the following:
    1. For Public inbound ports, click Allow selected ports.
    2. In the Select inbound ports list, choose RDP (3389) port.
  5. Under Licensing, leave the checkbox unselected.
  6. Click Next: Disks. The Disks pane appears.

Disks

You can use Disks pane to select the disk type, size and other details.

To configure disks

  1. Under VM disk encryption, leave the VM disk encryption checkbox unselected.
  2. Under the OS disk, do the following:
    1. In the OS Disk type list, choose Premium SSD (locally-redundant-storage).
    2. Select the Delete with VM checkbox.
    3. In the Key management list, choose Platform-managed key.
    4. Leave the Enable Ultra Disk compatibility checkbox unselected.
    5. Click Next : Networking >. The Networking pane appears.

Networking

You can use networking pane to add virtual network, subnet, public IP, network security group and other details. Azure automatically creates a network interface when creating a VM.

To add details in the networking pane

  1. Under Network interface, do the following:
    1. In the Virtual network list, choose a virtual network.
    2. In the Subnet list, choose the default subnet.
    3. In the Public IP list, choose the public IP.
    4. For NIC network security group option, click Basic.
    5. For Public inbound ports option, click Allow selected ports.
    6. In the Select inbound ports list, choose RDP (3389).
    7. Select the Delete public IP and NIC when VM is deleted checkbox.
  2. Leave the Load Balancing section to its default value.
  3. Click Next : Management >.
    The Management pane appears.

Management

You can use Management pane to enable auto-shutdown and select OS updates option.

To set up management

  1. Under Auto-shutdown, do the following:
    1. Select Enable auto-shutdown checkbox.
    2. In the Shutdown time box, enter the timings.
    3. In the Time zone list, choose the required time zone.
  2. Under Guest OS updates, in the Patch orchestration options list, choose Automatic by OS (Windows Automatic Updates).
  3. Click Next : Monitoring >.
    The Monitoring pane appears.

Monitoring

You can use the Monitoring pane to set up alert rules and diagnostic settings. By default, boot diagnostic is enabled with a managed storage account.

To configure alerts and diagnostics

  1. Under Alerts, select Enable recommended alert rules
  2. Under Diagnostics, click the required option.
  3. Click Next : Advanced >. The Advanced pane appears.

Advanced

You can use the Advanced pane to install VM applications, add custom data, user data and other advanced settings.

  1. In the Advanced pane, choose the required options and click Next : Tags >. The Tags pane appears.

SQL Server settings

You can use the SQL Server settings to set up SQL authentication, Security and networking, SQL instance settings, and others.

  1. In the SQL Server settings pane, either go with the default values or choose the required settings for the following:
    1. Security and Networking: Choose the SQL connectivity and port.
    2. SQL Authentication: Enable or disable SQL authentication and Azure key vault integration.
    3. Storage Configuration: Go with the default configuration.
    4. SQL instance settings: Go with the default configuration.
    5. SQL Server license: Choose either default option No or Yes, if you have a SQL server license.
    6. Automated patching: Change configuration for patching if required.
    7. Automated backup and R Services: Default values
  1. Click Next : Tags >.

The Tags pane appears.

Tags

  1. Enter a name for the tag in the Name box.
  2. In the Value box, enter a value.
  3. Choose the number of resources from the Resource list box.
  4. Click Next : Review + create >. The Review + create pane appears.

Review + create

  1. Once the validation is passed, review the VM details and click Create.

Create an Azure Virtual Machine with SQL

Take the Next Step: Embrace the Power of Cloud Services

Ready to take your organization to the next level with cloud services? Our team of experts can help you navigate the cloud landscape and find the solutions that best meet your needs. Contact us today to learn more and schedule a consultation.

Seamless Storage Expansion: Attaching a Data Disk to Your Azure VM

Azure – How to Attach a New Data Disk to VM

Attaching a New Data Disk to an Azure VM 

This article provides step-by-step instructions for attaching a new data disk to an Azure virtual machine (VM) using the Azure portal. Note that the number of data disks you can attach depends on the size of your VM.

How to Add a New Data Disk to an Azure VM

To create and add a new disk to VM.

  1. Sign in to the Azure Portal.
  2. In the Search box, search for Virtual machines. The Virtual machine pane appears.
  3. Choose a virtual machine from the list.
  4. In the Virtual machine pane, under Settings, click Disks. The Disks pane appears.
  5. To create and add a new data disk to VM, under Data disks, click Create and attach a new disk.
  6. In the dropdown boxes for the new disk, Specify the disk details, such as disk name, size, storage account, caching preferences, and disk type.
  7. Click Save to create and attach the new data disk to the VM.

The New data disk is attached to the VM.

Take the Next Step: Embrace the Power of Cloud Services

Ready to take your organization to the next level with cloud services? Our team of experts can help you navigate the cloud landscape and find the solutions that best meet your needs. Contact us today to learn more and schedule a consultation.

Close Bitnami banner
Bitnami