Tag: Azure SQL Database Server

Exploring the Exciting Azure SQL Updates Unveiled in August 2023

Azure SQL Updates for August 2023

Azure SQL Updates

Azure SQL offers secure SQL database engines for applications. This post highlights August 2023 updates.

External REST Endpoint Invocation

Now, let’s explore External REST Endpoint Invocation. Microsoft Build 2023 introduced it—a way to integrate Azure Services into Azure SQL Database effortlessly with just one line of code. This feature enriches data, handles complex calculations, and invokes machine learning models. For instance, you can analyze customer reviews by calling an Azure Function via an external REST endpoint.

XML Compression for Azure SQL

Next, focus on the second feature, available since August 2023. XML compression reduces storage needs for Azure SQL Database and Azure SQL Managed Instance by compressing off-row XML data. Using ALTER INDEX, apply XML compression to existing XML indexes to reduce storage space by up to 75%.

Always Encrypted with Intel SGX Enclaves

Always Encrypted secures sensitive data within client applications. Extend it with secure enclaves, enabling computations on encrypted data within the database server’s protected memory region. You can perform operations like pattern matching and sorting on encrypted data without decryption.

In August 2023, Always Encrypted with Intel SGX enclaves entered public preview for Azure SQL Database on DC-series hardware with up to 40 vCores, offering better performance.

New JSON Type and JSON Aggregates

Without delay, explore Azure SQL’s latest JSON features. Since 2016, Azure SQL has supported JSON as a native data type. It lets you store and query JSON documents using standard SQL operators and functions. August 2023 introduced two new features: a lightweight JSON type and JSON aggregates.

Currently in public preview, the new JSON type outperforms NVARCHAR(MAX) by offering faster parsing, better storage efficiency, JSON Schema support, partial updates using JSON Patch, and change tracking with JSON Diff.

The JSON aggregates are a set of new aggregate functions that allow you to perform calculations on JSON values and return JSON results. These functions include:

  • JSON_ARRAYAGG: This returns a JSON array containing the aggregated values.
  • JSON_OBJECTAGG: It Returns a JSON object containing the aggregated key-value pairs.
  • JSON_QUOTE: Function returns a JSON string containing the quoted value.
  • JSON_MERGE: Returns a JSON value that results from merging two or more JSON values.

Conclusion

In summary, these updates and enhancements from August 2023 strengthen Azure SQL, helping you build more powerful, secure applications.
Take the Next Step: Embrace the Power of Cloud Services

Ready to take your organization to the next level with cloud services? Our team of experts can help you navigate the cloud landscape and find the solutions that best meet your needs. Contact us today to learn more and schedule a consultation.

Creating a Secure Azure SQL Database: A Step-by-Step Tutorial

How to Create an Azure SQL Database

Creating SQL Database

This section provides step-by-step instructions on how to create an Azure SQL database.

Azure SQL Database is a comprehensive platform as a service (PaaS) database engine that takes care of various database management functions, including upgrading, patching, backups, and monitoring, without requiring user intervention. It operates on the latest stable version of the SQL Server database engine and patched OS, ensuring 99.99% availability at all times.

To create an Azure SQL database

  1. Sign in to the Azure Portal.
  2. In the Search box, search for SQL database. The SQL databases pane appears.
  3. Under SQL databases, click Create.

The Create SQL database pane appears.

Azure SQL Database Server

Basics

You can use the Basics pane to create SQL database with your preferred configurations.

To configure basics

  1. Under Project details, do the following:
    1. In the Subscription list, choose the required subscription.
    2. In the Resource group list, choose the required resource group.
    3. If you do not have one, click Create new, enter the name, and click OK.
  2. Under Database details, do the following:
    1. In the Database name box, type database name.
    2. In the Server list, click Create new.

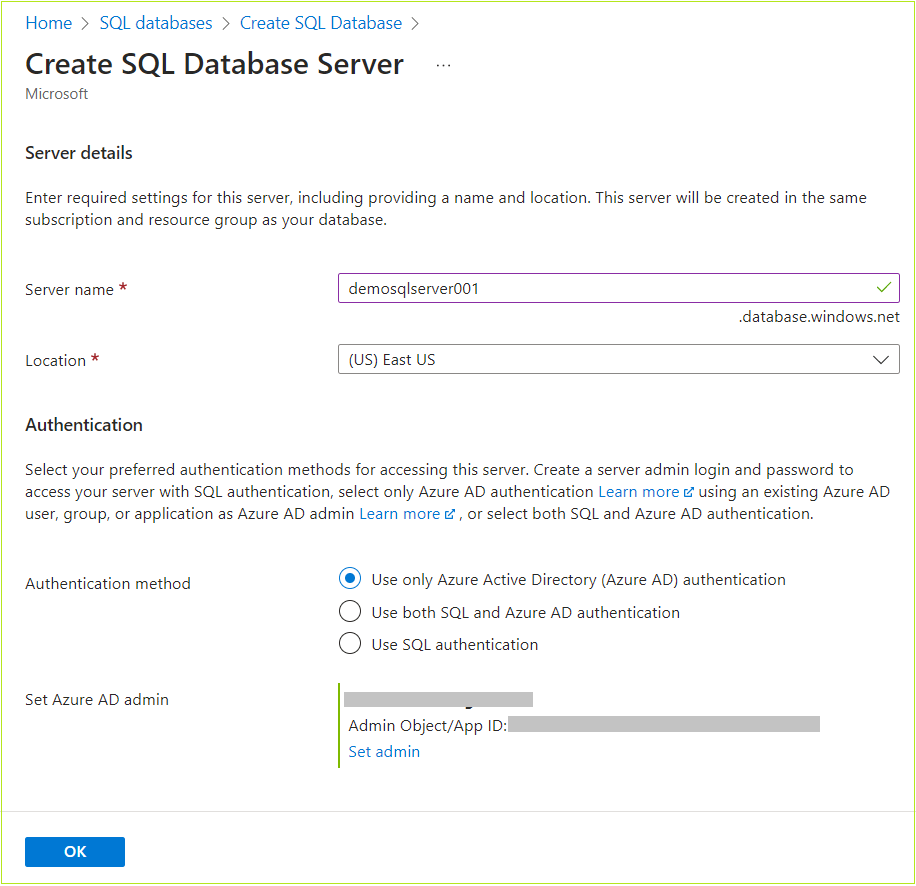
The Create SQL Database server pane appears.

  1. Under Server details, in the Server name box, type a server name.
  2. In the Location list, choose the default location.
  3. Under Authentication, for Authentication method option, choose the required authentication.
  4. Click OK.
  5. The Create SQL Database – Basics pane appears.
  6. Under Backup storage redundancy, click the required option.
  7. Click Next : Networking >.

The Networking pane appears.

Networking

You can use the Networking pane to configure network connection and connection policy.

To configure Networking

  1. Under Network connectivity, click the required connectivity method.
  2. Under Connection policy, click required policy.
  3. Under Encrypted connections, in the Minimum TLS version list, choose the required TLS version.
  4. Click Next : Security >.

The Security pane appears.

Security

You can use the Security pane to configure the following:

To configure Security

  1. Choose the required options in the Security
    1. Microsoft Defender for SQL: Whether to enable Microsoft defender for SQL.
    2. Ledger: Allows you to configure ledger.
    3. Identity: Allows you to configure identities.
    4. Transparent data encryption: Allows you to configure transparent data encryption.
  2. Click Next : Additional settings.

The Additional settings pane appears.

Additional settings

You can use the Additional settings pane to configure parameters including database collation and maintenance window.

To configure additional settings

  1. Choose the required options or continue with the default values.
  2. Click Next : Tags>.

The Tags pane appears.

Tags

To create tags

  1. In the Name box, enter a name for the tag.
  2. In the Value box, enter a value.
  3. Choose the number of resources from the Resource.
  4. Click Next : Review + create >.

The Review + create pane appears.

Review + create

Review all the SQL database configuration details and create.

  1. Review the details of the SQL database configuration and then click Create.

The newly created SQL database appears in the SQL databases pane.

Create SQL Database

Take the Next Step: Embrace the Power of Cloud Services

Ready to take your organization to the next level with cloud services? Our team of experts can help you navigate the cloud landscape and find the solutions that best meet your needs. Contact us today to learn more and schedule a consultation.