Tag: Azure Blob Storage

Azure Malware Scanning: A Comprehensive Guide

Azure Malware Scanning: A Comprehensive Guide

Are you looking for a way to protect your Azure storage accounts from malware threats? Do you want to ensure that your data is safe and secure in the cloud? If yes, then you need to know about Azure Malware Scanning in Defender for Storage.

Azure Malware Scanning is a feature that scans your Azure Blob storage accounts for malware infections. It detects and alerts you of any malicious files that may compromise your data or applications. You can also use it to quarantine or delete the infected files automatically.

This blog post will explain Azure Malware Scanning, its benefits, and usage.

What is Azure Malware Scanning in Defender for Storage?

Azure Malware Scanning is a feature that leverages Microsoft’s threat intelligence and machine learning to scan your Azure Blob storage accounts for malware. It supports both block blobs and append blobs, and scans both new and existing files.

Azure Malware Scanning is part of Azure Defender for Storage, a security service providing advanced threat protection for your Azure storage accounts. Azure Defender for Storage also offers anomaly detection, encryption enforcement, firewall auditing, and more.

What are the advantages of Azure Malware Scanning in Defender for Storage?

Malware Scanning in Defender for Storage offers several advantages for your cloud security, such as:

  • Helps you prevent data breaches and comply with regulatory standards by detecting and removing malware from your storage accounts.
  • Saves you time and resources by scanning your files automatically and continuously without requiring any manual intervention or configuration.
  • Gives you visibility and control over your storage security by providing you with alerts, reports, and remediation options.
  • Integrates with other Azure services and tools, such as Azure Security Center, Azure Sentinel, Azure Monitor, and Microsoft 365 Defender.

How to use?

To use Malware Scanning in Defender for Storage, you need to follow these steps:

  1. Enable Azure Defender for Storage on your subscription or resource group level. You can do this from the Azure portal, PowerShell, or CLI.
  2. Configure the malware scan settings for your storage accounts. You can choose to scan all or selected containers and specify the action to take when malware is detected. You can quarantine, delete, or log the infected files.
  3. Monitor the scan results and alerts from the Azure portal, Security Center, Sentinel, or Monitor. You can also view the scan reports and statistics from the Defender dashboard.
  4. Review and remediate the infected files from the quarantine container or the log file. If you’ve accidentally deleted some files, don’t worry! You can still retrieve them using the soft delete feature.

That’s it! You have successfully enabled and used Malware Scanning in Defender for Storage. Now, you can enjoy a more secure and reliable cloud storage experience.

Take the Next Step: Embrace the Power of Cloud Services

Ready to take your organization to the next level with cloud services? Our team of experts can help you navigate the cloud landscape and find the solutions that best meet your needs. Contact us today to learn more and schedule a consultation.

Azure Static Website Hosting Made Easy

Azure Static Website Hosting Made Easy

This blog post will teach us how to host a static website in Azure Storage. A static website consists of HTML, CSS, JavaScript, and image files that do not require any server-side processing. Azure Storage is a scalable and cost-effective service that allows you to store and access data from anywhere.

Overview

Azure Storage offers a feature called static website hosting, which enables you to serve your static website directly from a storage account. You do not need to create or manage any web servers or virtual machines. You only need to upload your website files to a designated container in your storage account and configure a few settings.

Features of Azure Storage for Azure Static Website

Some of the benefits of using Azure Storage for Azure static website hosting are:

  • Low cost: You only pay for the storage space and bandwidth you use. There are no additional charges for web servers or other resources.
  • High availability: Azure Storage provides 99.9% availability for read operations and 99.99% for write operations. Your website will be accessible even if one or more regions experience an outage.
  • Scalability: Azure Storage can handle any amount of traffic and data. You can easily scale up or down your storage account as your needs change.
  • Security: Azure Storage supports encryption at rest and in transit. You can also use Azure Active Directory (AAD) to control access to your storage account and website files.
  • Performance: Azure Storage integrates with Azure Content Delivery Network (CDN), which caches your website files at edge locations worldwide. This reduces latency and improves user experience.

Getting Started with Azure Static Website

To host a static website in Azure Storage, you need to follow these steps:

  1. Create an Azure Storage account or use an existing one. Ensure that the account is of the general-purpose v2 (GPv2) type and supports HTTPS traffic.
  2. Enable static website hosting on your storage account. Specify the container’s name that will store your website files and the name of the default document (usually index.html).
  3. Upload your website files to the container using any tool or method that supports Azure Blob storage, such as Azure Portal, Azure CLI, or Visual Studio Code.
  4. Enable Azure CDN on your storage account and create a CDN endpoint for it. This will generate a URL that you can use to access your website.
  5. Map your custom domain name to the CDN endpoint using your DNS provider. You can also enable HTTPS on your custom domain using a free certificate from Azure CDN.

Conclusion

Hosting a static website in Azure Storage is a simple and cost-effective solution that offers high availability, scalability, security, and performance. You can easily deploy and update your website without worrying about managing any web servers or virtual machines. You can also leverage Azure CDN to optimize your website delivery and user experience.

Take the Next Step: Embrace the Power of Cloud Services

Ready to take your organization to the next level with cloud services? Our team of experts can help you navigate the cloud landscape and find the solutions that best meet your needs. Contact us today to learn more and schedule a consultation.

Azure Blob Storage SDK Features

Azure Blob Storage SDK: Overview & Main Features

Demystifying the Main Features of Azure Blob Storage SDK

Overview

If you need to store and access a considerable amount of unstructured data, Azure Blob Storage is the perfect solution. Azure Blob Storage SDK is a set of libraries that enable you to interact with Azure Blob Storage programmatically using various languages and platforms.

Azure Blob Storage SDK Features

In this blog post, we will explain the main features and how it can help you simplify your development process and optimize your performance.

Data Protection and Encryption

Supports data protection and encryption features that help you secure your data at rest and in transit. You can use client-side encryption to encrypt your data before sending it to Azure Blob Storage using your encryption keys. Secure your data using either Microsoft-managed or customer-managed keys for encryption. Additionally, you can use Azure Key Vault to store and manage your encryption keys securely.

Data Movement and Performance Optimization

Offers secure data transfer with optimized performance. To expedite your data transfer, try utilizing parallel uploads and downloads. This involves dividing your data into several parts and sending them simultaneously. Additionally, you can utilize resumable uploads and downloads to pick up where you left off in the event of network disruptions. To further minimize bandwidth usage, consider using incremental snapshots and differential downloads which only transfer changes since the last snapshot.

Data Analysis and Processing

You can benefit from various data analysis and processing tools to extract valuable insights from your data and perform necessary transformations. Use query acceleration to run SQL queries directly on your blobs without having to download or process them first. Also, use the change feed to track the changes made to your blobs over time and trigger actions based on them. Moreover, you can use blob index tags to add metadata to your blobs and filter them based on custom criteria.

Azure Blob Storage SDK: Conclusion

In summary, Azure Blob Storage SDK is a powerful and flexible tool that enables you to work with Azure Blob Storage in various languages and platforms. It provides a rich set of features and options that allow you to customize your storage operations according to your needs and preferences.

Related Posts:

Take the Next Step: Embrace the Power of Cloud Services

Ready to take your organization to the next level with cloud services? Our team of experts can help you navigate the cloud landscape and find the solutions that best meet your needs. Contact us today to learn more and schedule a consultation.

Storing and Managing Data: Creating a Blob Container in Azure Portal

How to Create Azure Blob Storage

Azure Blob Storage: Quickstart Guide

This article provides step-by-step instructions on how to create Azure Blob storage in the Azure portal. Azure Blob Storage, a reliable and secure cloud-based service offered by Microsoft, is a superior solution for storing a wide variety of objects. With its advanced capabilities, it can effectively manage vast amounts of unstructured data, including binary and text data. Users can confidently store and easily manage their data using Azure Blob Storage without having to stress about the complexities of data management.

To create Azure blob Storage 

Creating a Blob Container in the Storage Account

  1. Sign in to the Azure Portal.
  2. In the Search box, search for Storage account.
  3. Choose the storage account that you created.
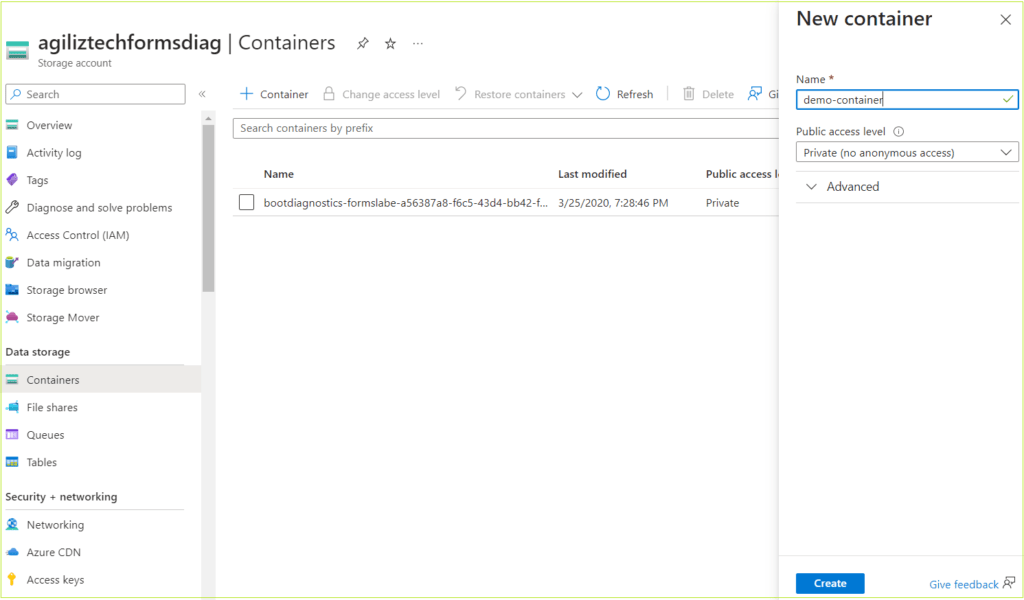
  4. In the left pane, under Data storage, click containers. The Containers pane appears.
  5. Click + Container. The New container blade appears.
  6. In the Name box, type a name for the container.
  7. In the Public access level list box, choose Private (no anonymous access) and then click Create.

The container you created appears in the list of containers.

Take the Next Step: Embrace the Power of Cloud Services

Ready to take your organization to the next level with cloud services? Our team of experts can help you navigate the cloud landscape and find the solutions that best meet your needs. Contact us today to learn more and schedule a consultation.

Close Bitnami banner
Bitnami