In this blog post, we piece together the steps involved in customizing notification content in iOS before displaying it to the user. Essentially, we will show how a chat application message can be customized to display a name for the sender’s number.
The need
In certain applications, for example chat apps, the server only saves the user’s numbers only. This is because the server cannot maintain the equivalent name of the mobile number as it is saved differently on each device. For example, the name Mr. Adam Smith can be saved as Adam, Adam Smith, Dad, Adam Smith 2, etc. Therefore, it is not possible for server to retain a name. Hence, it is upon the client, that is, the mobile app needs to display names and numbers appropriately, in notifications sent from server.
Developers can enable the application to find the equivalent name for a phone number that has sent you the message, by customizing the notification content in iOS using service and content extensions.
Let’s explore what extensions are and how to configure them, in the next few sections.
What is an extension?
Extensions are background applications, running independently from the app. They are around even when the app is not in the foreground. Service and Content extensions offer powerful new tools for customizing the notification information.
Service Extension
This object intercepts the push payloads from apps and helps developers to change content in the notification before it is presented.
Content extension
An object that presents a custom interface for a delivered local or remote notification. If you want to customize the UI of your notification you can use the content extension.
Note: Before getting started with notification extensions, the developer must be familiar with creating local and remote push notification.
Service Extension Setup
In the User Notifications framework, Apple introduced the Notification Service Extension. It’s a small program running in the background of your device that intercepts payload before notification center presents the push notification. In the Service Extension, you can modify your content with a UNMutablenotificationContent object modifying your content. That can be decrypting an encoded message or grabbing data in the userInfo to modify the content.
Setting up Service Extension
Here are steps to get started with the Service Extension:
- To set up the Notification Service Extension, you’ll need a new target in your application. In Xcode, go to File > New > Target.
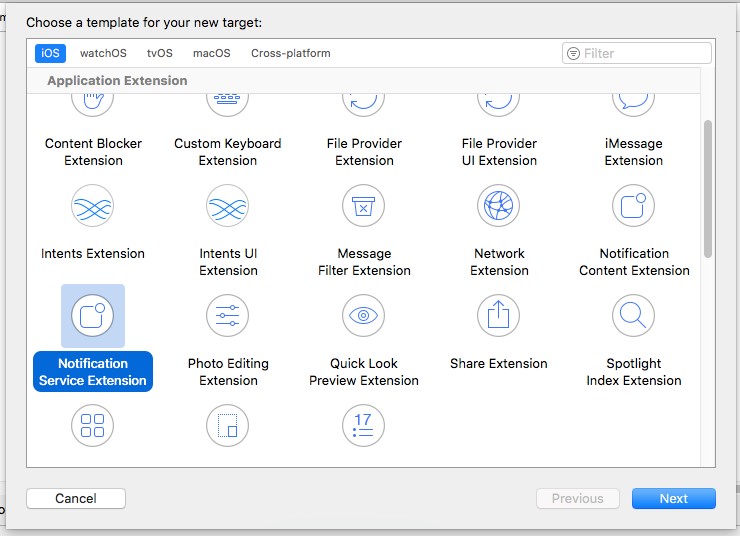
- In the menu box that appears, select iOS. In the list that appears, select Notification Service Extension.
- Click Next and enter the product name. it is a good practice to suffix ServiceExtension to the app name (that gives more clarity) – for example, yourProductName ServiceExtention.
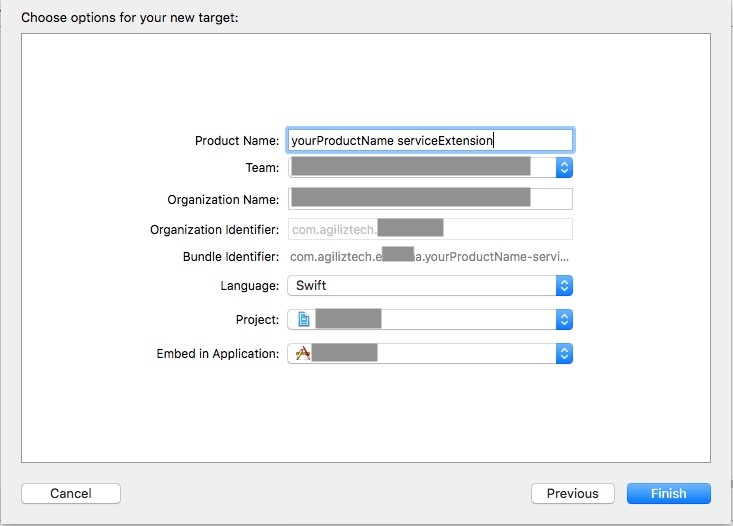
- Click Finish to complete setup.
- A dialog box appears seeking permission to activate the Service Extension Click Activate.
Using Service Extension
In the navigator a new group appears, which is the Service Extension. This group contains two files. Select the NotificationService.swift file.
This file consists of two functions and two properties. The core method used is the didReceive (Request: withContentHandler). This method assigns the content handler closure to one of the two properties. The other property, bestAttemptContent is a mutable copy of the push notification’s content. In this method, you change the content for the push notification, loading all that rich content you couldn’t fit in the payload, or do any change to the content you wish.
For example, Apple’s default template changes the title. You can go ahead and customize your title by changing “bestAttemptContent.title”.
override func didReceive(_request: UNNotificationRequest, withContentHandler contentHandler:
@escaping (UNNotificationContent) -> Void)
{
self.contentHandler = contentHandler
bestAttemptContent = (request.content.mutableCopy() as? UNMutableNotificationContent)
let contactName = “Surya”
if let bestAttemptContent = bestAttemptContent {
// Modify the notification content here…
bestAttemptContent.title = “\(contactName)”
contentHandler(bestAttemptContent)
}
}
Making changes in payload
Now that we have made adequate settings in the Service Extension, we will initiate changes in the payload. Ensure that you possess the key value pair in your payload’s aps directory.
“mutable-content”:1
Navigate to payload and add this key value pair. The result should look like this:
{
“aps”:{
“alert”:{
“title”:”9909912345″
},
“badge”:1,
“sound”:”default”,
“category”:”notification.category”,
“mutable-content”:1
},
“subtitle”: “How are you??”
}
You can test with this payload by using any 3rd party push testing tool. Here we are using NW pusher.
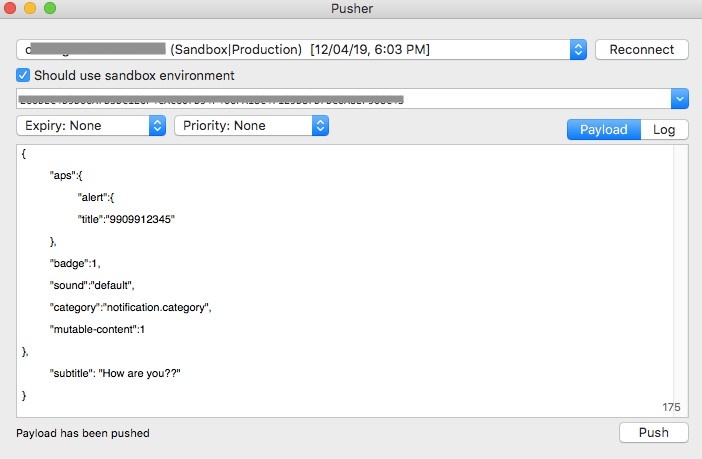
Configuring the Service Extension with user info
Follow the steps given below to configure the Service Extension:
- In Service Extension, click NotificationServiceExtension.swift file
The file has two functions – didReceive with contentHandler and serviceExtensionTimeWillExpire
- Place the custom information in the didReceive function. For example, you can change the notification title by editing this line:
bestAttemptContent.title = “custom Title”
- Place the custom information into the body, giving a list of the order, and add the subtitle to the subtitle property.
Note: You’ll need the userInfo dictionary. Let’s make referring to the dictionary easier by making it a constant in the function, casting it to the JSON dictionary type of [String:Any].
Here’s how it is done:
//get the dictionary
let userInfo = bestAttemptContent.userInfo as! [String:Any]
- Subtitles are user info in a payload but are a property of UNMutableNotificationContent, so they need to be transferred. Since it’s a dictionary entry, we’ll unwrap it and check for nil. If not nil, then we have a subtitle and can update the value. Let’s downcast the value to String when assigning it the subtitle content, since the dictionary has the value as Any.
//change the subtitle
if userInfo[“subtitle”] != nil{
bestAttemptContent.subtitle = userInfo[“subtitle”] as! String
}
For Example:
override func didReceive(
_ request:
UNNotificationRequest, withContentHandler contentHandler:
@escaping (
UNNotificationContent) ->
Void) {
self.contentHandler = contentHandler
bestAttemptContent = (request.content.mutableCopy() as?UNMutableNotificationContent)
if let bestAttemptContent = bestAttemptContent {// Modify the notification content here…
// bestAttemptContent.title = “Custom Title”
//Contact number from push payload has been received and the equivalent name of that number should be determined, and that name should be displayed as a notification title
let userInfo = bestAttemptContent.userInfo as! [String:Any]
guard let apsDict = userInfo[“aps”] as? [String:Any] else {return}
guard let alertDict = apsDict[“alert”] as? [String:Any] else {return}
if let contactNumber = alertDict[“title”] as? String {
let notificationTitle = findContactName(phoneNumber: contactNumber)
bestAttemptContent.title = “\(notificationTitle)”
}
//change the subtitle
if userInfo[“subtitle”] != nil{
bestAttemptContent.subtitle = userInfo[“subtitle”] as! String
}
bestAttemptContent.subtitle = “How are you??”
contentHandler(bestAttemptContent)
}
}
Here findContactName(phoneNumber: contactNumber) is the custom method which retrieves the contact name from our contact list by comparing the mobile number which has been pushed from our payload
With this step we are ready with the Service Extension. In the next section, we need to configure info.plist
The Property List
We’ve a few more steps to complete before running the notification:
- Go back to Xcode. There one more file in the service extension we’ve yet to look at.
- Click on the info.plist and open NSExtension.
- Open the NSExtensionAttributes and access the UNNotificationExtensionCategory
- Content extensions run on categories, so whatever category this property is, that will be the category of the notification found in content.category. Change it to category.
This extension will run for only the notification.category notifications. If an extension has another category, it will not run. Remember to do this. If you forget this, the extension will not work for you.
Run the Notification
You are ready to run the notification. When you add extensions, Xcode often defaults to the run scheme for the extension. Check to make sure you are on your device run scheme for the app.
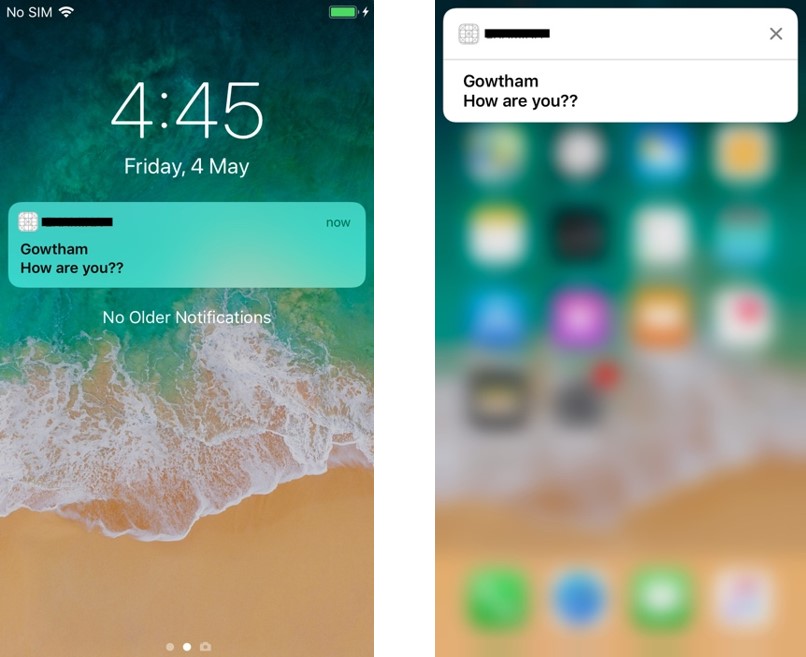
Results
In our payload we gave phone number and while receiving the notification we are getting the customized name.
References
- https://developer.apple.com/documentation/usernotifications/unnotificationserviceextension
- https://developer.apple.com/documentation/usernotificationsui/unnotificationcontentextension
- https://www.pushwoosh.com/docs/ios-10-rich-notifications-integration

 Customers prefer an app over a website as it is easier to browse through the products, has better information, easier to place orders which ultimately boosts the retail orders. This will enhance the growth of the business in terms of revenue as well as profits. Also, the payment options are safe, secure and easy as a customer can save his payment details and the next time the process becomes just a few clicks away.
 ess app is built in a way which serves the purpose and satisfies the customer needs, your brand will be recognized at the top of customer choices. Though your business has good online presence, to increase the potential of your brand build an app to reach out to masses.

