Category: Cloud Services

Microsoft Security Copilot: Fortifying Digital Defenses

Microsoft Security Copilot: Fortifying Digital Defenses

Microsoft Security Copilot: Overview

Cybersecurity is crucial to any business, especially in the digital age. However, managing security risks and threats can be challenging and time-consuming. That’s why Microsoft has developed Security Copilot, an AI-powered tool that helps you protect your data and devices from cyberattacks.

Security Copilot is a cloud-based service that integrates with Microsoft 365 and Azure. It provides you with a comprehensive and personalized security dashboard where you can monitor your security posture, identify vulnerabilities, and take action to remediate them. Security Copilot also leverages AI to analyze your security data and provide insights and recommendations on improving your security.

Features and Benefits

Some of the features and benefits of Security Copilot are:

  • Gives you a single view of your security status across your Microsoft products, services, and third-party applications and devices.
  • Alerts you of any security incidents or anomalies and helps you investigate and respond quickly and effectively.
  • Uses AI to prioritize the most critical security issues and suggest the best actions.
  • Helps you comply with industry standards and regulations, such as GDPR, HIPAA, PCI DSS, etc.
  • Enables you to create and enforce security policies and controls across your organization.
  • Allows you to customize your security settings and preferences according to your needs and preferences.

Getting Started with Microsoft Security Copilot

To use Security Copilot, you need to follow these steps:

  • Sign up for a free trial or a paid subscription on the Microsoft Security Copilot website.
  • Connect your Microsoft 365 account to the service using the Azure Active Directory (AAD) authentication.
  • Configure your security settings and preferences on the Security Copilot dashboard.
  • Start monitoring and managing your data security with the service.

Microsoft Security Copilot is a powerful and easy-to-use service that can help you protect your data from cyber threats. It leverages the advanced capabilities of Microsoft 365 and Azure to provide a comprehensive and integrated data security solution. Try it today and see how it can enhance your data security. To learn more, click here.
Take the Next Step: Embrace the Power of Cloud Services

Ready to take your organization to the next level with cloud services? Our team of experts can help you navigate the cloud landscape and find the solutions that best meet your needs. Contact us today to learn more and schedule a consultation.

Microsoft GitHub Copilot: AI-Driven Code Assistance

Microsoft GitHub Copilot: AI-Driven Code Assistance

Overview

Are you looking for a way to speed up your coding process and improve your productivity? If yes, then you should check out Microsoft GitHub Copilot, a new AI-powered tool that can help you write better code faster.

What is Microsoft GitHub Copilot?

Microsoft GitHub Copilot is a Visual Studio Code extension that uses artificial intelligence to suggest code snippets as you type. It can generate whole functions, tests, comments, and more based on your context and intent. It can also adapt to your coding style and preferences, learning from your feedback and edits.

What are the advantages?

The GitHub Copilot can help you save time and effort by automating some of the tedious and repetitive coding tasks. It can also help you discover new ways of solving problems, learn new APIs and frameworks, and avoid common errors and bugs. Moreover, it can enhance your creativity and innovation by suggesting alternative approaches and solutions you might not have considered.

How to use Microsoft GitHub Copilot?

To use GitHub Copilot, you must have a Visual Studio Code editor and a GitHub account. You can install the extension from the Visual Studio Code Marketplace or from the GitHub Copilot website. Once installed, you can start using it by typing some code in your editor and waiting for the suggestions to appear in a pop-up window. You can accept, reject, or modify the suggestions as you wish. You can also use keyboard shortcuts or voice commands to interact with the tool.

Some points to consider while using Microsoft GitHub Copilot:

  • Microsoft GitHub Copilot is not a replacement for human programmers. It is a tool that can assist you, but not do everything for you. You must still write some code, review the suggestions carefully, and test the output thoroughly.
  • GitHub Copilot is not a source of truth. It does not guarantee the correctness, completeness, or quality of the code it generates. It may sometimes produce inaccurate, inappropriate, or insecure code. You are responsible for verifying the validity and legality of your code.
  • GitHub Copilot is not a plagiarism tool. It does not copy code from existing sources but synthesizes new code from a large corpus of public code and natural language data. However, some of the code it generates may be similar to existing code, so you should always cite the sources if you use any code snippets from Microsoft GitHub Copilot.

Conclusion

Microsoft GitHub Copilot is a groundbreaking tool that can revolutionize how developers code. It can help you write better code faster, with less hassle and more fun. However, it is not a magic wand that can solve all your coding problems. You still need to use your judgment, skills, and ethics when using it. To learn more about GitHub Copilot, visit its official website or read its documentation.

Take the Next Step: Embrace the Power of Cloud Services

Ready to take your organization to the next level with cloud services? Our team of experts can help you navigate the cloud landscape and find the solutions that best meet your needs. Contact us today to learn more and schedule a consultation.

Amazon Redshift Serverless Evolution

Evolution of Amazon Redshift Serverless: Overview

Amazon Redshift Serverless – Evolution and Overview

Introduction

In the dynamic realm of cloud-based data warehousing, Amazon Redshift emerges as a potent solution. Its fully managed, petabyte-scale capabilities reliably drive intricate analytics tasks. This blog post takes a deep dive into the innovative concept of Amazon Redshift Serverless, tracing its evolution and exploring the seamless scaling it introduces to the analytics landscape.

Evolution of Amazon Redshift Serverless

Introduced at AWS re:Invent 2021, Amazon Redshift Serverless builds upon the foundation of the RA3 node type launched in 2019. The RA3 architecture revolutionized data warehousing by decoupling compute and storage layers. This novel approach allowed independent scaling, with RA3 nodes leveraging managed storage dynamically adjusted based on the cluster’s data.

Expanding this architecture, Amazon Redshift Serverless introduces automatic compute resource scaling. It replaces the traditional fixed node count clusters with the innovative concepts of namespaces and workgroups. A namespace encompasses a group of database elements and users sharing a common schema, while workgroups allocate compute resources for query execution across one or more namespaces. This architecture brings fine-tuned resource allocation and cost management to the forefront.

Overview of Amazon Redshift Serverless

Amazon Redshift Serverless disrupts analytics infrastructure management. Through automated resource allocation and intelligent scaling, it ensures consistent performance under demanding workloads. The challenges of cluster setup, fine-tuning, and management fade away, paving the way for immediate data loading and querying using the Amazon Redshift Query Editor or preferred BI tools.

Conclusion

The evolution of Amazon Redshift Serverless unveils a transformative journey from the foundational RA3 node type to the groundbreaking approach of automatic resource allocation and scaling. This metamorphosis ushers in a new era of precision and efficiency in analytics infrastructure. The upcoming blog post will delve into the multitude of features and advantages that Amazon Redshift Serverless offers.

Take the Next Step: Embrace the Power of Cloud Services

Ready to take your organization to the next level with cloud services? Our team of experts can help you navigate the cloud landscape and find the solutions that best meet your needs. Contact us today to learn more and schedule a consultation.

Microsoft EDR Solution: Proactive Endpoint Protection

Microsoft EDR Solution: Proactive Endpoint Protection

Microsoft EDR Solution: Protecting Your Endpoints in Real-Time

Overview

This blog post explains the Microsoft EDR solution, a powerful and integrated EDR system that leverages the capabilities of Microsoft Defender for Endpoint, Microsoft 365 Defender, and Azure Sentinel. The post focuses on the Microsoft EDR solution, discussing why it is essential and the benefits it provides.

Modern cybersecurity relies heavily on endpoint detection and response (EDR). EDR solutions empower organizations to monitor, detect, and respond actively to cyber threats targeting their endpoints, such as laptops, desktops, servers, and mobile devices. These solutions offer visibility into endpoint devices, user behaviors, and application activities, allowing swift and effective actions to contain and remediate incidents.

What is Microsoft EDR solution?

The Microsoft EDR solution is a comprehensive and unified EDR system that combines the strengths of three Microsoft products:

  • Microsoft Defender for Endpoint: This cloud-based endpoint security platform offers advanced protection, detection, investigation, and response capabilities for Windows 10, Windows Server 2019, Linux, macOS, Android, and iOS devices. Microsoft Defender for Endpoint utilizes behavioral analytics, machine learning, and artificial intelligence to identify and stop sophisticated attacks before they cause damage proactively. It also provides robust tools for threat hunting, forensic analysis, and automated remediation.
  • Microsoft 365 Defender: As a cloud-based security service, Microsoft 365 Defender delivers cross-domain threat protection for Microsoft 365 environments. It integrates data and capabilities from Microsoft Defender for Endpoint, Microsoft Defender for Office 365, Microsoft Defender for Identity, and Microsoft Cloud App Security to provide a holistic view of the attack surface and the attack chain. Additionally, it enables automated investigation and response across endpoints, email, identity, and cloud applications.
  • Azure Sentinel: This solution for security information and event management (SIEM) and security orchestration, automation, and response (SOAR) is cloud-native. It gathers and analyzes data from different sources, such as Microsoft products, third-party solutions, and custom connectors. Azure Sentinel employs advanced analytics and artificial intelligence to detect threats across the enterprise. It also offers flexible and scalable tools for incident management, threat hunting, and response automation.

Click here to learn how to onboard a Microsoft server into Microsoft Defender for Business.

By integrating these three products, Microsoft’s EDR solution provides a seamless and comprehensive EDR experience covering the entire endpoint lifecycle: prevention, detection, and response. Microsoft EDR solution enables organizations to:

  • Gain complete visibility into their endpoint environment and the activities of devices, users, and applications.
  • Detect advanced threats across endpoints, email, identity, and cloud applications using behavioral analytics, machine learning, and artificial intelligence.
  • Investigate incidents using rich contextual data and powerful tools for threat hunting and forensic analysis.
  • Respond to incidents quickly and effectively using automated actions or manual workflows.
  • Leverage the cloud scalability and flexibility of Microsoft EDR solution to adapt to changing needs and requirements.

Why is a Microsoft EDR solution required?

  • Organizations need the Microsoft EDR solution because cyber attackers primarily target endpoints. According to a recent report by Ponemon Institute, in 2019, 68% of organizations experienced one or more endpoint attacks that compromised data or IT infrastructure. The report also revealed that the average cost of an endpoint attack was $8.94 million in 2019.
  • Endpoints are vulnerable to cyberattacks due to their exposure to the internet or untrusted networks. Additionally, employees using endpoints may not always follow security best practices and may fall victim to phishing or social engineering attacks. Moreover, endpoints continually evolve with new devices, operating systems, applications, and features, introducing new vulnerabilities and challenges.
  • Organizations require an EDR solution that comprehensively protects, detects and responds to cyberattacks throughout the endpoint lifecycle. However, not all EDR solutions are created equal. Some EDR solutions may lack sufficient coverage, functionality, or integration with other security products or services. Some EDR solutions may also have high costs, complexity, or resource requirements, hindering their adoption or effectiveness.

What are the benefits of Microsoft EDR solution?

Microsoft EDR solution provides several benefits for organizations aiming to enhance their endpoint security posture and resilience, including:

  • Improved endpoint protection: Offers advanced protection capabilities that proactively prevent or block malicious activities or behaviors on endpoints. It also provides continuous monitoring and assessment of endpoint health and compliance status.
  • Faster threat detection: Uses behavioral analytics, machine learning, and artificial intelligence to detect advanced threats across endpoints, email, identity, and cloud applications. It also provides alerts and notifications for high-priority incidents and anomalies.
  • Deeper threat investigation: Provides rich contextual data, powerful threat hunting, and forensic analysis tools. It also offers insights and recommendations for root cause analysis and threat mitigation.
  • Effective threat response: Enables automated investigation and response across endpoints, email, identity, and cloud applications. It also allows manual actions or workflows for customized response scenarios.
  • Enhanced security posture: Microsoft EDR solution helps organizations improve their security posture and resilience by providing visibility, control, and guidance for endpoint security management. It also aids organizations in complying with security standards and regulations.

Conclusion

Microsoft EDR solution is a powerful and comprehensive service that can help organizations protect their endpoints from cyberattacks. By enabling MDE, M365D, and Azure Sentinel on their Windows servers, organizations can gain visibility, detection, response, and hunting capabilities for their endpoints.

Take the Next Step: Embrace the Power of Cloud Services

Ready to take your organization to the next level with cloud services? Our team of experts can help you navigate the cloud landscape and find the solutions that best meet your needs. Contact us today to learn more and schedule a consultation.

Smooth Onboarding with Microsoft EDR Solution: A How-To Guide

Microsoft EDR Solution Onboarding: A How-To Guide

Microsoft EDR Solution: Step-by-Step Onboarding Guide

Overview

Microsoft EDR is a comprehensive and integrated EDR solution that leverages the capabilities of Microsoft Defender for Endpoint, Microsoft 365 Defender, and Azure Sentinel. It provides organizations with complete visibility, detection, investigation, and response capabilities across their endpoint environment. It also offers several advantages over other EDR solutions, such as comprehensive coverage, integrated functionality, cloud-based delivery, cost-effectiveness, and ease of use. Click here to know more about Microsoft EDR Solution.

This blog post provides you a brief overview of Microsoft Defender for Business, its benefits and installation procedures.

What is Microsoft Defender for Business?

Cybersecurity is a top priority for any business in the digital age. Cyberattacks can cause significant damage to your reputation, productivity, and bottom line. That’s why you need a comprehensive and reliable solution to safeguard your data, devices, and network from malicious actors.

Microsoft Defender for Business is one of the best options available today. A cloud-based security platform that integrates with Microsoft 365 and Azure to provide end-to-end protection for your organization.

Benefits

Microsoft Defender for Business offers a range of features and benefits that make it a superior choice for your cybersecurity needs. Here are some of them:

  • Leverages artificial intelligence and machine learning to detect and respond to threats in real time. It uses advanced behavioral analytics and threat intelligence to identify and block known and unknown attacks, such as ransomware, phishing, and zero-day exploits.
  • Enables you to manage your security posture from a single dashboard. You can easily monitor and control your devices, applications, data, and identity across your entire organization. You can also set policies and rules to enforce compliance and best practices.
  • Empowers you to prevent data breaches and data loss. It encrypts your data at rest and in transit and allows you to control who can access it and how. It also helps you recover your data in case of an incident, with built-in backup and restore capabilities.
  • Supports your remote workforce and hybrid work environment. It allows you to secure your devices and data wherever they are, whether on-premises or in the cloud. It also integrates with Microsoft Teams and other collaboration tools to enable secure communication and teamwork.
  • Reduces your costs and complexity. It eliminates the need for multiple security products and vendors and simplifies your security management and operations. It also offers flexible pricing options that suit your budget and needs.

Onboarding Microsoft Defender for Business on Windows Servers

To install Microsoft Defender for Business on Windows servers

  1. Log in to the Microsoft Defender portal https://security.microsoft.com/ with Admin credentials.
  2. In the left pane, go to Settings, then click Endpoints.

Microsoft 365 Defender Home page

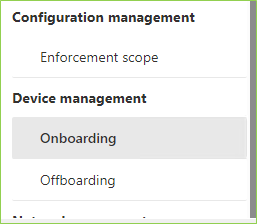
  1. In the Endpoints page, under Device Management, click Onboarding.

Device Management-Onboarding

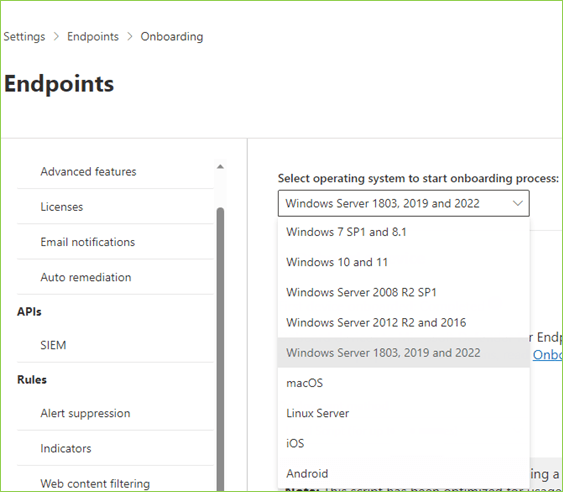
  1. In the Select operating system to start onboarding process dropdown, choose the respective server OS. For example, Windows Server 1803, 2019 and 2022.

Select Operating System

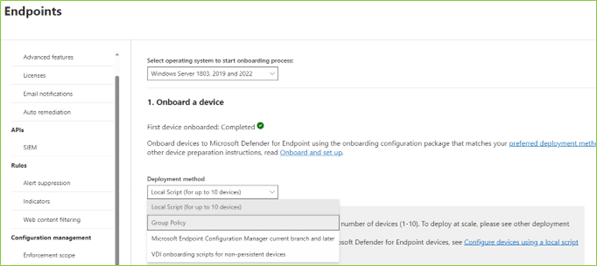
  1. In the Onboard a device section, click the Deployment Method dropdown, and then choose Group Policy.

Deployment Method - Group Policy

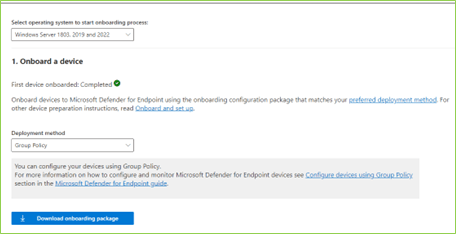
  1. Click Download the Onboarding package into the respective server, this will download the OptionalParamsPolicy folder and WindowsDefenderATPOnboardingScript file.

Download Onboarding Package

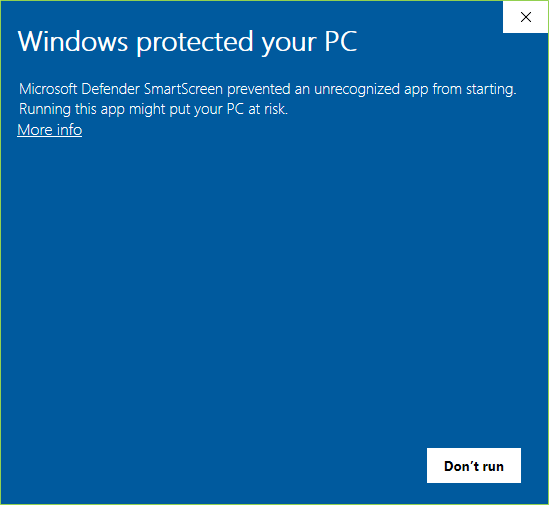
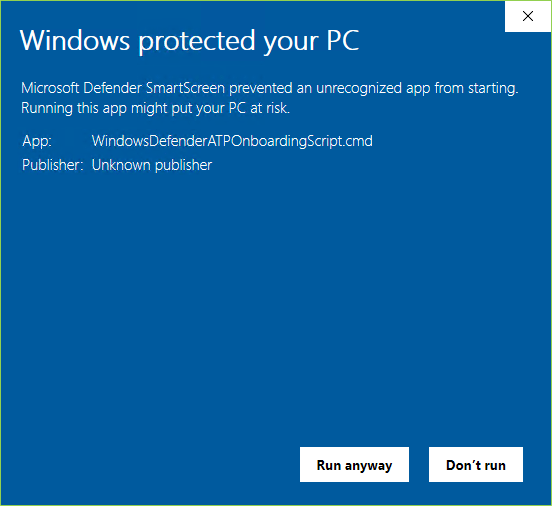
  1. Double-click the WindowsDefenderATPOnboardingScript file to run the script. The Windows protected your PC dialog box appears.

WindowsDefenderATPOnboardingScript

  1. Click More info.

Run Script - More Info

    1. Click Run anyway.

Run anyway - Script

It takes a while to onboard the device.

Running a Detection Test

To verify that the device is properly onboarded and reporting to the service, run the detection script on the newly onboarded device:

  1. Open Command Prompt window.
  2. In the prompt, copy and run the command below.
powershell.exe -NoExit -ExecutionPolicy Bypass -WindowStyle Hidden $ErrorActionPreference= 'silentlycontinue';(New-Object System.Net.WebClient).DownloadFile('http://127.0.0.1/1.exe', 'C:\\test-WDATP-test\\invoice.exe');Start-Process 'C:\\test-WDATP-test\\invoice.exe'

The Command Prompt window closes automatically.

If successful, the detection test will be marked as completed and a new alert will appear in few minutes.

Microsoft Defender for Business is a powerful and comprehensive security solution that can help you protect your organization from cyber threats. If you want to learn more about how it works and how it can benefit you, contact us today. We are a certified Microsoft partner and we can help you implement and optimize Microsoft Defender for Business for your business.

Take the Next Step: Embrace the Power of Cloud Services

Ready to take your organization to the next level with cloud services? Our team of experts can help you navigate the cloud landscape and find the solutions that best meet your needs. Contact us today to learn more and schedule a consultation.

Creating Azure Active Directory: Simplifying Identity Management in the Cloud

Microsoft Entra ID: The New Name for Azure AD

Microsoft Entra ID: What’s in a name?

Microsoft has recently announced that it will rebrand its popular cloud-based identity and access management service, Azure Active Directory, as Microsoft Entra ID. This change will take effect in early 2024, and will affect all existing and new customers of the service. But why did Microsoft decide to change the name of such a well-known and widely used product? And what does Entra ID mean?

In this article, we will explore the reasons behind this rebranding and how it reflects Microsoft’s vision and strategy for the future of identity and security in the cloud.

Why change the name?

Azure Active Directory, or AAD for short, was launched in 2010 as a cloud-based version of Microsoft’s on-premises Active Directory service. It provides identity and access management for Windows-based networks. AAD enables users to sign in and access applications and resources across Microsoft’s cloud platform, Azure, as well as third-party services that integrate with AAD. AAD also offers features such as multi-factor authentication, single sign-on, conditional access, identity protection, and more.

Over the years, AAD has become one of the world’s most popular and trusted cloud identity services, with over 400 million active users and over 30 billion authentication requests per day. AAD supports over 3,000 pre-integrated applications and is used by over 90% Fortune 500 companies.

However, Microsoft realized that the name Azure Active Directory no longer accurately reflects the scope and capabilities of the service. As Microsoft’s cloud platform evolved, so did AAD. It is not just a directory service for Azure anymore. AAD is a comprehensive identity platform that works across multiple clouds, hybrid environments, and devices. It is also not just an extension of Active Directory anymore. It is a modern and innovative service which leverages machine learning, artificial intelligence, and blockchain to provide secure and seamless identity experiences for users and organizations.

Therefore, Microsoft decided to rename AAD as Microsoft Entra ID, to better communicate its value proposition and differentiation in the market.

What does Entra ID mean?

Microsoft Entra ID is a combination of two words: Entra and ID. Entra is derived from the Latin “intrare”, meaning “to enter”. ID is an abbreviation for “identity”. Entra ID signifies Microsoft’s mission to enable users to enter any application or resource with their identity, regardless of where they are or what device they use.

Microsoft Entra ID also conveys Microsoft’s vision to empower users and organizations with intelligent and adaptive identity solutions that enhance security, productivity, and collaboration in the cloud era.

What are the benefits of Entra ID?

Microsoft Entra ID will offer the same features and functionality as AAD, but with a new name and logo that align with Microsoft’s brand identity and design language. Customers using AAD today will not need to change their configurations or integrations. They will simply see the new name and logo in their portals, documentation, and communications from Microsoft.

However, Microsoft Entra ID will also bring some new benefits to customers, such as:

  • A simplified and consistent naming scheme across Microsoft’s cloud services. For example, instead of Azure AD B2C (Business to Consumer), customers will see Microsoft Entra ID B2C. Instead of Azure AD B2B (Business to Business), customers will see Microsoft Entra ID B2B.
  • A unified and integrated identity experience across Microsoft’s cloud offerings. For example, customers using Microsoft 365, Dynamics 365, Power Platform, or other Microsoft cloud services can manage their identities using Entra ID as a single-entry point.
  • A more flexible and extensible identity platform that can support new scenarios and use cases in the future. For example, customers can leverage Entra ID’s capabilities for decentralized identity using blockchain technology or for verifiable credentials using digital certificates.

Conclusion

Microsoft Entra ID is more than just a name change. It reflects Microsoft’s commitment to delivering innovative and secure identity solutions for the cloud era. By rebranding AAD as Entra ID, Microsoft aims to simplify its messaging, unify its identity offerings, and extend its platform for new opportunities and challenges.

Take the Next Step: Embrace the Power of Cloud Services

Ready to take your organization to the next level with cloud services? Our team of experts can help you navigate the cloud landscape and find the solutions that best meet your needs. Contact us today to learn more and schedule a consultation.

Unlocking Connectivity: A Guide to Resetting Network Interfaces for Azure VMs

Reset Network Interface for Azure VM: Steps

Learn to Reset the Network Interface of Azure VM

Overview

The presence of a network interface (NIC) empowers an Azure virtual machine (VM) to establish connections with internet, Azure, and on-premises resources. When you create a VM using the Azure portal, a default NIC is automatically assigned to it. However, you have the flexibility to craft NICs with personalized configurations and attach them to a VM at the time of creation or even afterwards. Furthermore, you retain the ability to modify settings for any existing NIC, granting you full control over your VM’s networking capabilities.

But, have you ever found yourself in a perplexing situation where your connection to an Azure Windows VM mysteriously vanished after a routine reboot? Imagine your Windows Server on Azure working flawlessly, only to lose connectivity following a Microsoft-scheduled reboot or an advisor recommendation. What would you do in such a predicament?

Fear not, for there is a solution! Follow the given steps to reset your Network Interface for Azure Windows VMs using the Azure Portal.

Steps to Reset Network Interface

  1. Sign in to the Azure portal.
  2. Choose the required Virtual Machine.
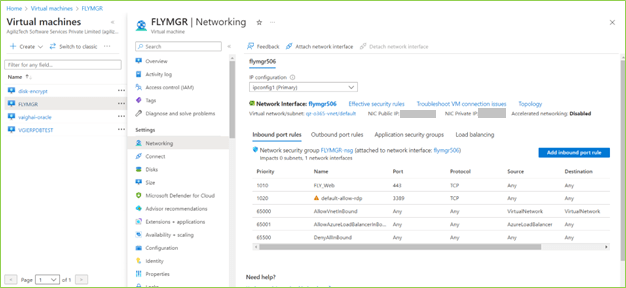
  3. In the left pane, under Settings, choose Networking and then choose Network Interface.
  4. In the left pane, under Settings, choose IP Configurations.

The IP configurations pane appears.

Reset Network Interface

  1. Choose the IP.
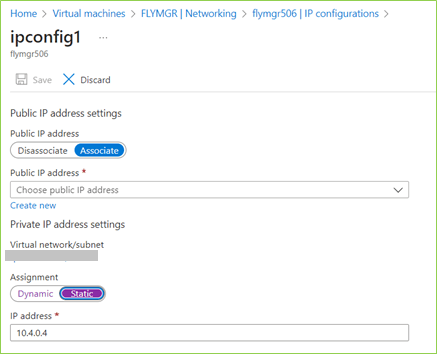
  2. Under the Private IP address settings, if the Assignment is Dynamic, change it to Static.
  3. In the IP address box, enter a different IP address available in the Subnet.

Reset Network Interface

The virtual machine restarts to initialize the new NIC to the system.

  1. Try to Remote desktop to the machine you changed.

You should be able to successfully RDP. If you want, change the private IP address back to previous one or you can go with the new IP address.

Take the Next Step: Embrace the Power of Cloud Services

Ready to take your organization to the next level with cloud services? Our team of experts can help you navigate the cloud landscape and find the solutions that best meet your needs. Contact us today to learn more and schedule a consultation.

Efficient Resource Optimization: How Azure Resource Visualizer Enables Streamlined Resource Utilization

Why Azure Resource Visualizer is Essential?

Why Azure Resource Visualizer is a Valuable Tool

Overview

Azure’s Resource Visualizer is an innovative feature seamlessly integrated into the Azure portal. It enables you to access it effortlessly through the settings of any Resource Group. You can swiftly generate a diagram encompassing all the resources within the selected resource group.

Azure Resource Visualizer

How Azure Resource Visualizer Helps

With Resource Visualizer, you can:

  • Visual Representation: The Resource Visualizer provides a graphical representation of your Azure resources. This allows you to visualize the structure and layout of your resources intuitively.
  • Dependency Visualization: The tool lets you see the relationships and dependencies between different Azure resources, helping you understand how they interact.
  • Resource Group Focus: The Visualizer allows you to focus on a specific resource group and view its resources. This provides a clear understanding of the resource hierarchy within the group.
  • Resource Documentation: You can export the visual diagrams from Resource Visualizer and use them for documentation purposes. This provides a clear and visual representation of your resource architecture.
  • Resource Planning and Management: Resource Visualizer helps you plan and manage your Azure resources more effectively by providing a high-level view of their relationships. This assists in optimizing resource deployments and configurations.
  • Collaboration and Communication: The visual diagrams created by Resource Visualizer can be shared with team members and stakeholders, facilitating better collaboration and communication about the resource architecture.
  • Resource Insights: Resource Visualizer provides insights into your architecture, allowing you to understand resource dependencies better and identify potential issues.

Conclusion

Overall, it is a valuable tool for understanding and visualizing the complex relationships between Azure resources. It simplifies the process of exploring your resource architecture, enhances collaboration among teams, and supports efficient resource management within your Azure subscription. To visualize your resources, click How to visualize your Azure Resources.

Take the Next Step: Embrace the Power of Cloud Services

Ready to take your organization to the next level with cloud services? Our team of experts can help you navigate the cloud landscape and find the solutions that best meet your needs. Contact us today to learn more and schedule a consultation.

Demystifying Azure Resource Visualizer: Step-by-Step Tutorial for Effective Resource Visualization

How Azure Resource Visualizer Works

Efficient Resource Mapping with Azure Resource Visualizer

Overview

In a scenario where you’re pressed for time and require an immediate diagram of your environment, wouldn’t it be convenient if there was a method to simply select your resources and automatically generate a comprehensive diagram? This diagram would not only display all the resources within your environment but also illustrate the relationships among them. Fortunately, Azure now offers a solution to fulfill this need.

Azure Resource Visualizer is a powerful feature integrated into the Azure portal that provides an interactive and visual representation of your Azure resources and their dependencies. It allows you to gain a comprehensive overview of your resource architecture and understand the relationships between different resources.

To use Azure Resource Visualizer

  1. Sign in to the Azure Portal.
  2. In the Search box, search for Resource group and choose Resource group from the result.
  3. In the Resource Groups pane, choose the required Resource group and click Resource Visualizer.

Note: By default, the diagram shows all resources in the subscription.

Azure Resource Visualizer

  1. To filter the resources, click Choose Resources.

The Resources pane appears.

  1. Choose the required resources to appear in the diagram.

The selected resources diagram appears.

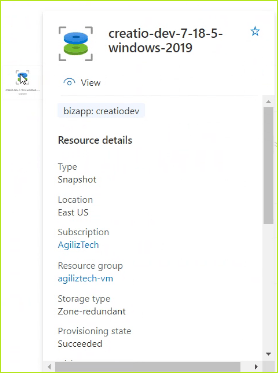
Tips: Hovering over a resource box displays a tooltip showing details such as resource type, name, and resource group.

Azure Resource Visualizer

  1. To export the diagram for further analysis or documentation, click Export PNG in the top-right corner of the Azure Resources Visualizer pane.

This downloads the diagram as a PNG image file.

That’s it! You can now use Azure Resources Visualizer to explore and understand the relationships between your Azure resources visually and intuitively.

Take the Next Step: Embrace the Power of Cloud Services

Ready to take your organization to the next level with cloud services? Our team of experts can help you navigate the cloud landscape and find the solutions that best meet your needs. Contact us today to learn more and schedule a consultation.

Creating an Amazon Virtual Private Cloud (VPC): A Simple and Clear Step-by-step Guide

Amazon Virtual Private Cloud: Step-by-step Guide

Creating Amazon Virtual Private Cloud (VPC)

Overview

You can start up AWS services in a predefined virtual network that is logically separated using Amazon Virtual Private Cloud (Amazon VPC). This virtual network has the advantage of leveraging the scalable infrastructure of AWS while closely resembling a conventional network you would manage in your own data center.

To create an Amazon Virtual Private Cloud

  1. Sign in to the AWS Management Console.
  2. In the Search box, search for VPC and choose VPC from the results.

The VPC dashboard pane appears.

  1. Click Create VPC.

The Step 1: Select a VPC Configuration pane appears.

Creating Amazon Virtual Private Cloud

  1. Choose VPC with Public and Private Subnets and then click Select.

The Step 2: VPC with Public and Private Subnets pane appears.

  1. Do the following:
    1. In the IPv4 CIDR block box, type the required IPv4 CIDR.
    2. For IPv6 CIDR block, click No IPv6 CIDR Block.
    3. In the VPC name box, type a name for the VPC.
    4. In the Public subnet’s IPv4 CIDR box, type the required subnet.
    5. In the Availability Zone list, choose No Preference or the required zone.
    6. In the Public subnet name box, type a name.
    7. For Enable DNS hostnames, click Yes.
    8. In the Hardware tenancy list, choose Default.
  2. Click Create VPC.

The newly created VPC appears in the Your VPCs pane.

Take the Next Step: Embrace the Power of Cloud Services

Ready to take your organization to the next level with cloud services? Our team of experts can help you navigate the cloud landscape and find the solutions that best meet your needs. Contact us today to learn more and schedule a consultation.

Close Bitnami banner
Bitnami