Category: Amazon AWS

Creating an Amazon S3 Bucket: A Simple and Clear Step-by-step Guide

Amazon S3 Bucket Creation: Step-by-step Guide

Creating Amazon S3 Bucket in AWS Console

Overview

Amazon S3 Bucket or Amazon Simple Storage Service is a highly scalable, secure, and performant object storage service. It caters to customers of various sizes and industries, offering a wide array of use cases for data storage and protection. These use cases encompass data lakes, websites, mobile applications, backup and restore operations, archival purposes, enterprise applications, IoT devices, and big data analytics.

Amazon S3 not only ensures data availability but also provides robust security measures. It empowers users with management features that enable optimization, organization, and customized access configuration to meet specific business, organizational, and compliance needs.

To Create an Amazon S3 bucket

  1. Sign in to the AWS Management Console.
  2. In the Find Services box, type S3 and choose Amazon S3 from the results.
  3. In the left pane, under Amazon S3, click Buckets.
  4. In the Buckets pane, click Create bucket.

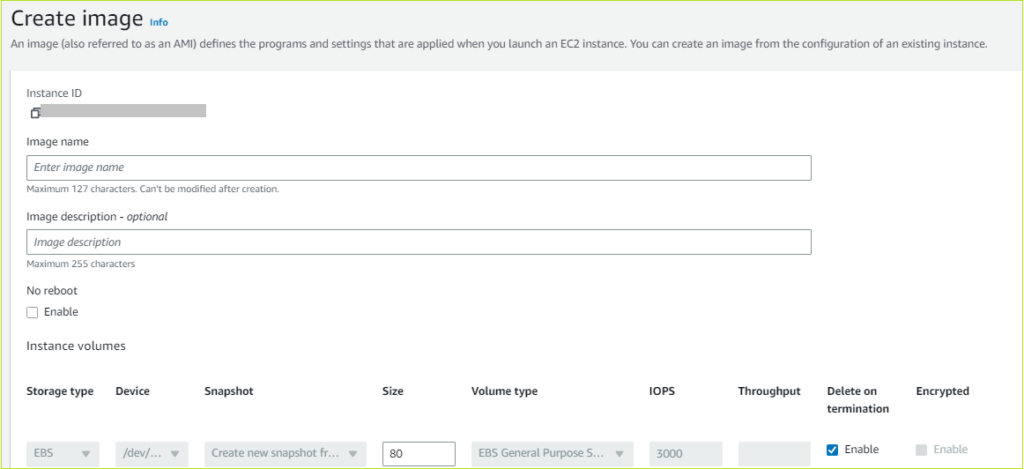
The Create bucket pane appears.

Creating Amazon S3 Bucket

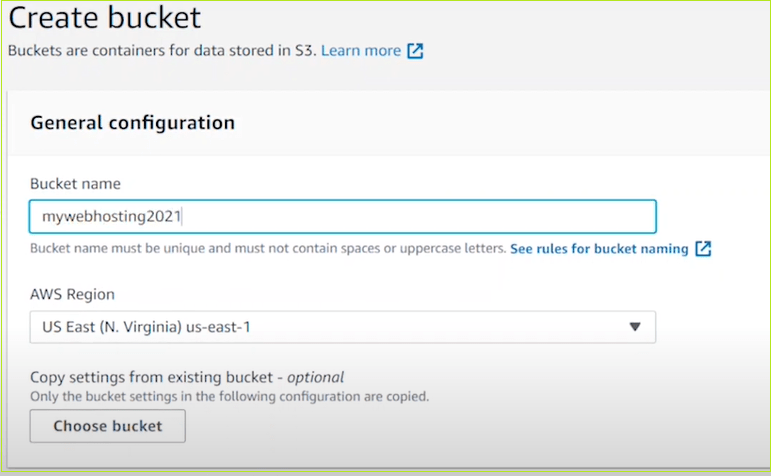
  1. Under General configuration, do the following:
    1. In the Bucket name box, type a unique bucket name.
    2. In the AWS Region list, choose the required region.
    3. To copy settings from the existing bucket, click Choose bucket and choose the required bucket settings.
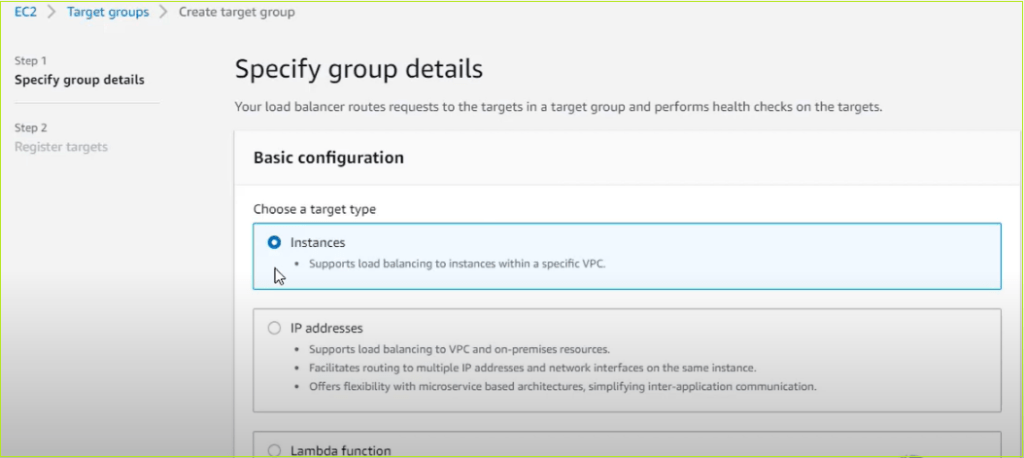
  2. Under Object Ownership, go with the default option ACLs disabled (recommended).
  3. Under Block Public Access settings for bucket, select Block all public access
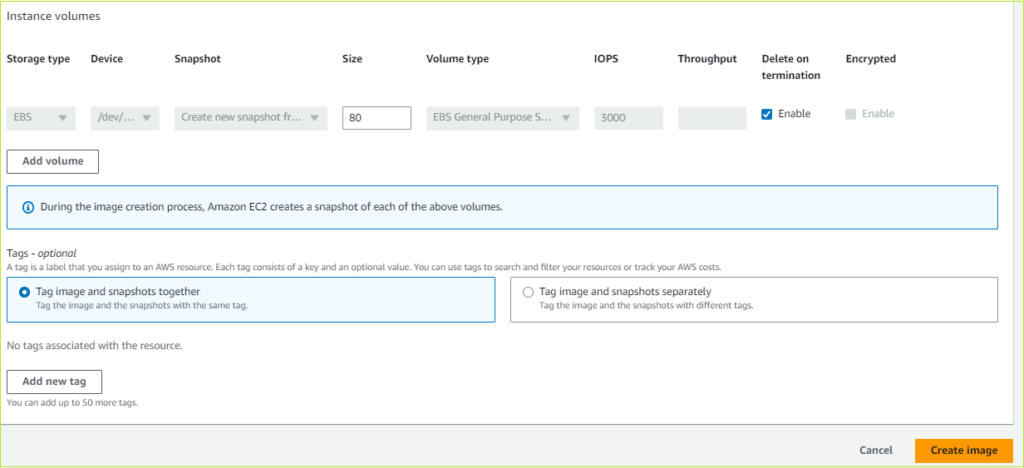
  4. Under Tags – optional, click Add tag to track storage costs and organize buckets.
  5. Under Default encryption, do the following:
    1. For Encryption key type, click Amazon S3 managed keys (SSE-S3).
    2. For Bucket key, click Enable.
  6. Under Advanced settings, for Object Lock, choose Enable if you want to enable object lock.

Note: Object Lock for a bucket may only be turned on at the time of creation; it cannot be turned off afterwards. Versioning for the bucket is also enabled by turning on Object Lock. To prevent new objects from being destroyed or rewritten after activation, you must adjust the Object Lock default retention and legal hold settings.

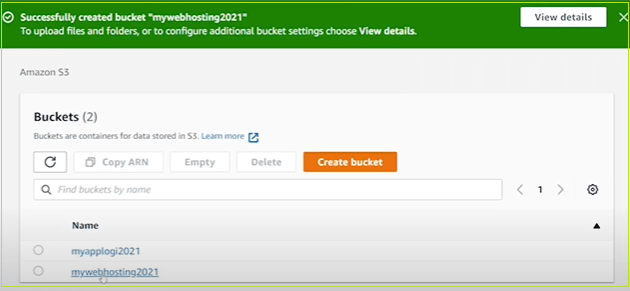
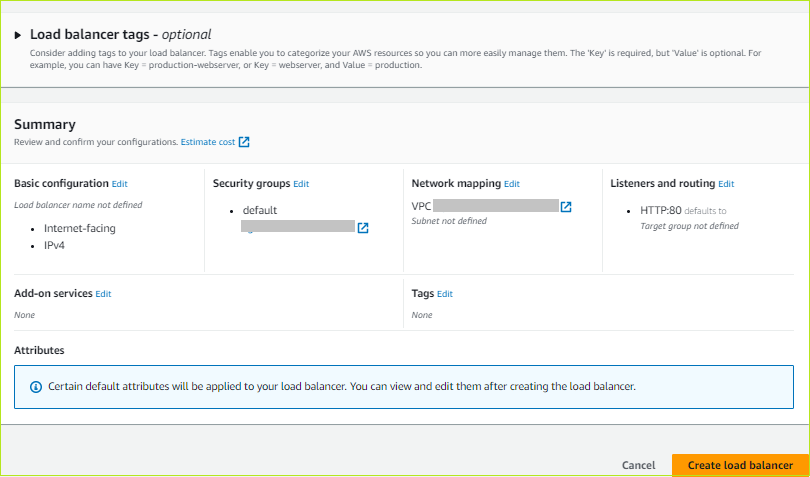
  1. Choose Create bucket.

The newly created bucket appears in the Buckets pane.

Creating Amazon S3 Bucket

Take the Next Step: Embrace the Power of Cloud Services

Ready to take your organization to the next level with cloud services? Our team of experts can help you navigate the cloud landscape and find the solutions that best meet your needs. Contact us today to learn more and schedule a consultation.

Step-by-step Guide: Creating Amazon Network Load Balancer with Ease

Amazon Network Load Balancer Creation: Procedures

Creating Amazon Network Load Balancer

Overview

Amazon’s Network Load Balancer operates on the fourth layer of the Open Systems Interconnection (OSI) model, enabling efficient handling of millions of requests every second. Upon receiving a connection request, the load balancer intelligently chooses a target from the designated target group based on the default rule. It then proceeds to establish a TCP connection with the selected target, utilizing the port specified in the listener configuration.

To create an Amazon network load balancer

  1. Sign in to the AWS Management Console.
  2. In the Find Services box, type EC2 and choose EC2 from the results.
  3. In the left pane, under Load Balancing, choose Load Balancers.

The Load Balancers pane appears.

  1. Click Create load balancer.

The Load balancer types pane appears.

Creating Amazon Network Load Balancer

  1. Under Network Load Balancer, click Create.

The Create Network Load Balancer pane appears.

  1. Under Basic configuration, do the following:
    1. In the Load balancer name box, enter a name for the load balancer.
    2. For Scheme, click Internet-facing.
    3. For IP address type, click IPv4.
  2. Under Network mapping, do the following:
    1. In the VPC list, choose the virtual private cloud for the targets.
    2. For Mappings, select the checkbox for the availability zones. You can select one subnet per availability zone.
  3. Under Security groups, in the Security groups list, choose a security group or create one.
  4. Under Listeners and routing, do the following:
    1. Under Listener HTTP:80, in the Default action list, choose a target group or click Create target group to create a new target group.
    2. Click Add listener tag (optional) to add a tag.
    3. To add another Listener, click Add listener.
  5. For AWS Global Accelerator (optional), select the checkbox to create an accelerator and associate the load balancer with accelerator.
  6. Under Load balancer tags (optional), choose Add tag, and enter the key and value.
  7. Under Summary, review the configuration details and click Create load balancer.

Creating Amazon Network Load Balancer

Take the Next Step: Embrace the Power of Cloud Services

Ready to take your organization to the next level with cloud services? Our team of experts can help you navigate the cloud landscape and find the solutions that best meet your needs. Contact us today to learn more and schedule a consultation.

Simplified Load Balancer Setup: A Step-by-step Guide for Amazon Application Load Balancer

Amazon Application Load Balancer Creation: Procedures

Creating Amazon Application Load Balancer

Overview

The Amazon Application Load Balancer operates at the application layer, which corresponds to the seventh layer of the Open Systems Interconnection (OSI) model. Upon receiving a request, the load balancer assesses the listener rules in a hierarchical order to identify the appropriate rule to apply. Subsequently, it chooses a target from the target group associated with the rule’s action.

To create an Amazon application load balancer

  1. Sign in to the AWS Management Console.
  2. In the Find Services box, type EC2 and choose EC2 from the results.
  3. In the left pane, under Load Balancing, choose Load Balancers.

The Load Balancers pane appears.

  1. Click Create load balancer.

The Load balancer types pane appears.

  1. Under Application Load Balancer, click Create.

The Create Application Load Balancer pane appears.

Creating Amazon Application Load Balancer

  1. Under Basic configuration, do the following:
    1. In the Load balancer name box, enter a name for the load balancer.
    2. For Scheme, click Internet-facing.
    3. For IP address type, click IPv4.
  2. Under Network mapping, do the following:
    1. In the VPC list, choose the virtual private cloud for the targets.
    2. For Mappings, select the checkbox for the availability zones. You can select one subnet per availability zone.
  3. Under Security groups, in the Security groups list, choose a security group or create one.
  4. Under Listeners and routing, do the following:
    1. Under Listener HTTP:80, in the Default action list, choose a target group or click Create target group to create a new target group.
    2. Click Add listener tag (optional) to add a tag.
    3. To add another Listener, click Add listener.
  5. For AWS Global Accelerator (optional), select the checkbox to create an accelerator and associate the load balancer with the accelerator.
  6. Under Load balancer tags (optional), choose Add tag, and enter the key and value.
  7. Review the configuration details under Summary and click Create load balancer.

Creating Amazon Application Load Balancer

Take the Next Step: Embrace the Power of Cloud Services

Ready to take your organization to the next level with cloud services? Our team of experts can help you navigate the cloud landscape and find the solutions that best meet your needs. Contact us today to learn more and schedule a consultation.

Step-by-step Tutorial: Creating Target Groups for Seamless Request Routing

Creating Target Group: Step-by-step Guide

Creating Target Group in AWS Console

Overview

In AWS, a target group serves the purpose of routing requests toward one or more registered targets. You can specify a target group for its default action upon creating a listener. The traffic is then directed to the target group specified in the listener rule. Creating multiple target groups tailored to different types of requests is possible. For instance, you can create a target group specifically for general requests, and create separate target groups to handle requests directed towards the microservices within your application.

To create Target Group in AWS Console

  1. Sign in to the AWS account.
  2. In the Find Services box, type EC2 and choose EC2 from the results.
  3. In the right pane, under LOAD BALANCING, choose Target Groups.

The Target groups pane appears.

  1. Choose Create target group.

The Create target group pane appears.

Creating Target Group

  1. Under Basic configuration, do the following:
    1. For Choose a target type, click
    2. In the Target group name box, enter a name for the target group.
    3. For Protocol list, choose the required protocol.
    4. In the Port list, change the default value as required.
    5. For IP address type, click IPv4 or IPv6.
    6. In the VPC list, choose the virtual private cloud (VPC) with the targets to register.
  2. Under Health checks, modify the default settings as needed.
  3. Under Tags – optional, expand Tags, choose Add a tag, and type a tag key and a tag value.
  4. Choose Next.

The Register targets pane appears.

  1. In the Register targets pane, choose the instances, enter the ports, and choose Include as pending below.
  2. Choose Create target group.

The newly created Target group appears in the Target groups pane.

Take the Next Step: Embrace the Power of Cloud Services

Ready to take your organization to the next level with cloud services? Our team of experts can help you navigate the cloud landscape and find the solutions that best meet your needs. Contact us today to learn more and schedule a consultation.

AMI Creation Simplified: A Step-by-Step Guide for Creating Amazon Machine Images

Creating Amazon Machine Image: Procedures Guide

Creating Amazon Machine Image (AMI) in AWS Console

Overview

An Amazon Machine Image (AMI) is a pre-configured and maintained image offered by AWS, containing all the necessary information to initiate an instance launch. When launching an instance, it is essential to specify an AMI. Creating Amazon Machine Images helps you create multiple instances with identical configurations, you can launch them from a single AMI. Conversely, you can utilize different AMIs to initiate their launch if you require instances with diverse configurations.

To create Amazon Machine Image

  1. Sign in to the AWS Management Console.
  2. In the Find Services box, type EC2 and choose EC2 from the results.
  3. In the left pane, under Instances, click Instances.

The EC2 instances dashboard appears.

Creating Amazon Machine Image

  1. Choose the Instance to create the AMI, choose->Actions->Image and templates->Create image.

The Create image pane appears.

  1. In the Image name box, enter a name for the image.
  2. In the Image description – optional box, enter a brief description of the image.
  3. For No reboot, keep the default value (Enable checkbox cleared).
  4. Under the Instance volumes, do the following:
    1. In the Size box, enter the size of the volume.
    2. For Delete on termination, select the Enable
    3. To add another volume, click Add volume.
    4. Under Tags – optional, click Tag image and snapshots together.
  5. Click Create image.

Creating Amazon Machine Image

The new AMI appears in the Amazon Machine Images (AMIs) pane.

Note: The creation of the AMI could take a few minutes. It will appear in AWS Explorer’s AMIs view as soon as it is produced. The AMI may initially show in a pending state but changes to an available state after a brief interval.

Take the Next Step: Embrace the Power of Cloud Services

Ready to take your organization to the next level with cloud services? Our team of experts can help you navigate the cloud landscape and find the solutions that best meet your needs. Contact us today to learn more and schedule a consultation.

Simplified Walkthrough: Launching Amazon EC2 Instances in the AWS Console

Launching Amazon EC2 Instance: Step-by-step Guide

Launching Amazon EC2 Instance in AWS Console

Overview

Amazon EC2 offers a diverse set of instance types that are tailored to certain use cases. Instance types are different combinations of CPU, memory, storage, and networking capabilities that allow you to pick the best mix of resources for your applications. Each instance type comes with one or more instance sizes, allowing you to scale your resources to meet the needs of your intended workload. Refer to the steps below for launching an Amazon EC2 Instance.

To launch Amazon EC2 Instance

  1. Sign in to AWS Management Console.
  2. In the Find Services box, type EC2 and choose EC2 from the results.
  3. In the left pane, under Instances, choose Instances.

The EC2 instances dashboard appears.

  1. Choose Launch instances.

The Launch an instance pane appears.

Launching Amazon EC2 Instance

  1. Under Name and tags, type a name and tag details.
  2. Under Application and OS Images (Amazon Machine Image), in Quick Start tab choose the required Image. For example, Red Hat.
  3. Click 64-bit (Arm) and then click Select.
  4. In the AMI from catalog tab, click Free tier eligible.
  5. In the Instance type list, choose the instance type.
  6. In the Key pair (login) list, choose a key pair name.

To create a new key pair, click Create new key pair.

The Create key pair page appears. Type a name for the key pair, choose key pair type and private key file format and then click Create key pair.

  1. Under Network settings, do the following:
    1. In the VPC required list box, choose the required VPC.
    2. In the Subnet list box, choose the required subnet or create one by clicking Create new subnet.
    3. In the Auto-assign public IP list, choose Disable.
    4. For Firewall (security groups), click Select existing security group.
    5. In the Common security groups list, choose security groups.
  2. Under Configuration storage, add the required number of volumes.
  3. Under Summary, in the Number of instances box, enter the number of instances to launch.
  4. Review the instance details and click Launch instance.

Launching Amazon EC2 Instance

The Instance is created and appears in the EC2 dashboard.

Take the Next Step: Embrace the Power of Cloud Services

Ready to take your organization to the next level with cloud services? Our team of experts can help you navigate the cloud landscape and find the solutions that best meet your needs. Contact us today to learn more and schedule a consultation.

Creating Amazon EBS Volume

Creating Amazon EBS Volume: Step-by-step Guide

Creating Amazon EBS Volume in AWS Console

Overview

An Amazon Elastic Block Store (EBS) volume serves as a long-lasting storage device at the block level, capable of being connected to your instances. Once attached, this volume functions similarly to a physical hard drive, providing you with versatile storage capabilities. With EBS volumes, flexibility is key. For modern volumes attached to contemporary instance types, you have the ability to seamlessly expand the size, adjust the provisioned IOPS capacity, and even alter the volume type of live production volumes. Follow the steps below to learn about creating Amazon EBS Volume.

To create Amazon EBS volume

  1. Sign in to AWS Management Console.
  2. In the Find Services box, type EC2 and choose EC2 from the results.
  3. In the left pane, under Elastic Block Store, click Volumes.

The Volumes pane appears.

  1. Click Create volume.

The Create volume pane appears.

Creating Amazon EBS Volume

  1. Under Volume settings, do the following:
    1. In the Volume type list, choose required volume type.
    2. In the Size box, enter the size of the volume.
    3. In the IOPS box, enter the maximum number of input or output operations per second.
    4. For the Throughput (MiB/s), go with the default value.
    5. In the Availability Zone list, choose the required availability zone.
    6. In the Snapshot ID list, choose Don’t create volume from a snapshot.
    7. To encrypt the volume, select Encrypt this volume
  2. Under Tags – optional, click Add tag to assign customized tags to the volume.
  3. Click Create volume.

Creating Amazon EBS Volume

The newly created blank volume appears in the Volumes pane.

Take the Next Step: Embrace the Power of Cloud Services

Ready to take your organization to the next level with cloud services? Our team of experts can help you navigate the cloud landscape and find the solutions that best meet your needs. Contact us today to learn more and schedule a consultation.

Close Bitnami banner
Bitnami