Reset Network Interface for Azure VM: Steps
Learn to Reset the Network Interface of Azure VM
Overview
The presence of a network interface (NIC) empowers an Azure virtual machine (VM) to establish connections with internet, Azure, and on-premises resources. When you create a VM using the Azure portal, a default NIC is automatically assigned to it. However, you have the flexibility to craft NICs with personalized configurations and attach them to a VM at the time of creation or even afterwards. Furthermore, you retain the ability to modify settings for any existing NIC, granting you full control over your VM’s networking capabilities.
But, have you ever found yourself in a perplexing situation where your connection to an Azure Windows VM mysteriously vanished after a routine reboot? Imagine your Windows Server on Azure working flawlessly, only to lose connectivity following a Microsoft-scheduled reboot or an advisor recommendation. What would you do in such a predicament?
Fear not, for there is a solution! Follow the given steps to reset your Network Interface for Azure Windows VMs using the Azure Portal.
Steps to Reset Network Interface
- Sign in to the Azure portal.
- Choose the required Virtual Machine.
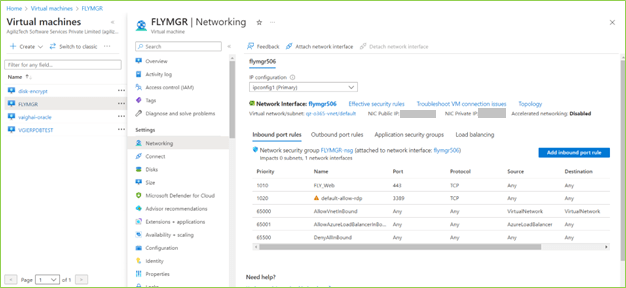
- In the left pane, under Settings, choose Networking and then choose Network Interface.
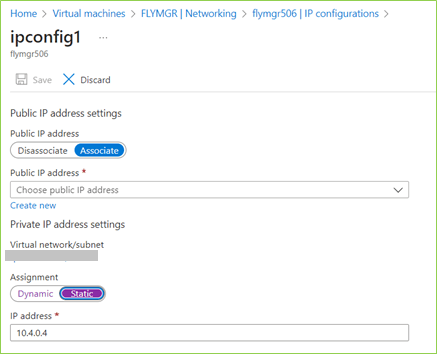
- In the left pane, under Settings, choose IP Configurations.
The IP configurations pane appears.

- Choose the IP.
- Under the Private IP address settings, if the Assignment is Dynamic, change it to Static.
- In the IP address box, enter a different IP address available in the Subnet.

The virtual machine restarts to initialize the new NIC to the system.
- Try to Remote desktop to the machine you changed.
You should be able to successfully RDP. If you want, change the private IP address back to previous one or you can go with the new IP address.
